Littleton Food Co-op

a community-owned market

Social Icons

Open Daily 7am - 8pm
Meat: 7am - 7pm
Deli: 7am-6pm Sun-Thu / 7am-7pm Fri & Sat

  • Home
  • About
    • Departments
    • Recall Info
  • Community
    • The Weekly Radish – News & Specials!
    • Listen to Our Podcast
    • Workshops & Events
    • Diversity, Equity, & Inclusion
    • Sustainability
    • Partner of the Month
    • Littleton Food Co-op Community Fund
    • Healthy Food Access
    • SNAP & Market Match
    • Co-op Café & Art Gallery
    • Art in the Pavilion
  • Membership
    • Become a Member!
    • Reports & Governing Documents
    • Patronage Rebates
  • Store
    • The Weekly Radish – Fresh Specials For Everyone!
    • Daily Menu
    • Workshops & Events
    • Buy A Gift Card Online
    • Online Ordering & Curbside Pickup
    • Party Platters & Custom Baskets
    • Local Vendors
    • Co-op Café & Art Gallery
    • Art in the Pavilion
    • Bulk Item Lookup
  • Careers
  • Board of Directors
    • Meet the Board of Directors!
    • Co-op Board Elections
    • Join The Board
    • Reports & Governing Documents
  • Contact & FAQ
    • Become a Vendor
    • Frequently Asked Questions

Fire Cider Recipe from Heartsong Farm Wellness

January 13, 2025 By Anastasia Maher

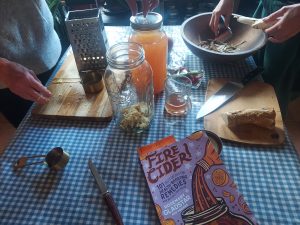
We were fortunate enough to host Grace Phillips of Heartsong Farm Wellness Center at the Littleton Co-op in January 2024 to lead a class on fire cider. Participants learned about typical fire cider ingredients and the benefits of this beloved tonic. While herbalist Rosemary Gladstar has the best known recipe for fire cider, it has truly evolved to be more of a concept than an exact recipe after years of adaptation in the herbalism and wellness communities. That being said, you can truly make this your own, so don’t fret about exact measurements or the need to substitute or omit an ingredient. After all, you’re the one who is going to be consuming it, so make it to your enjoyment.

Whatever ingredients you want to include in your fire cider, make sure to grab them here at the Littleton Co-op! We have the North Country’s best selection of local organic produce (often on sale!) to make your fire cider shine. Below is the recipe Grace shared during the Co-op’s fire cider making class:


Ingredients

 ½ gallon raw apple cider vinegar
 2 Onions (yellow preferred), chopped
 1 Lemon, zested and juiced
 2-3 Cayenne Peppers, chopped
 1 Fresh Ginger Root, grated
 1 Fresh Horseradish Root, grated
 2 bulbs Garlic, crushed or chopped
 Small jar of raw Honey

Equipment

 ½ gallon glass mason jar
 1 correct size lid (ideally the plastic ‘no spill’, but regular metal lid is fine)
 Cheese grater
 Paring Knife
 2 Cutting Boards
 4 small bowls
 Small and large spoons
 Parchment or wax paper
 Cheesecloth or strainer
 Paring Knife
 2 Cutting Boards
 4 small bowls
 Small and large spoons

Place your desired amounts (or all of each) of the onion, lemon zest, lemon juice, cayenne peppers, ginger, and horseradish into the canning jar. Cover with apple cider vinegar by two to four inches. If using a metal canning jar lid, place a piece of parchment or wax paper under the lid to prevent the vinegar from touching the metal. Shake well. Store in a dark, cool place for one month and shake daily during that time.

After one month, use a cheesecloth or strainer to separate the solid ingredients and any pulp from the liquid, pouring the vinegar liquid into a clean jar. Add honey to taste and balance out the fiery ingredients. 1/4 cup honey is a good place to start. Stir honey into vinegar until incorporated. Taste and continue adding honey until reaching desired sweetness level. The mixture should taste spicy, hot, and sweet (if desired).

Fire cider can keep for several months unrefrigerated and in a cool pantry, but it is best kept in the fridge. Use as a daily wellness tonic, or as a sauce for salads, vegetables, and grains. And if you don’t want to discard your strained out ingredients, check out this waste-reducing recipe for Fire Cider Chutney from our friends at Shelburne Farms. Enjoy!

Filed Under: Farms, Food, Green Team, Local, Recipes Tagged With: DIY, local farms, NH Eats Local, recipes, shop local, wellness

10 Unique Ways to Present a Gift Card

December 16, 2024 By Anastasia Maher

In many ways, a gift card is the perfect gift. It’s always the recipient’s favorite flavor, correct size, and matches all dietary restrictions. And a gift card to the Littleton Food Co-op is a surefire way to make sure your loved one is getting quality local food options at great prices. You can even purchase a Littleton Co-op gift card online and have it sent directly to your recipient (contiguous US addresses only). However, gift cards also get slept on as a present option, often said to be underappreciated and underwhelming because of their small size and frankly, lack of creativity. That’s where we come in! Here are some creative ways to present a gift card to your recipient that will have them saying “best present ever!”

Frame it Up

A simple frame will do, but take it one step further and replace the boring background photo it comes with with a pretty scrap of fabric, a colorful burst of paper, original art, or even a photo — hey, who woulda thought!?

Wine AND Money

To create a non-boring gift, just combine two stereotypically boring gifts into one! Use some ribbon and bow making skills (if you have) to attach the gift card. Bonus points if the wine is from our wide selection of domestic, international, organic, and fair-trade wine options at the Littleton Co-op.

Knit a Pouch

A generically labeled “pouch” is great for beginner crafters or those without a lot of time; who says it has to be square or symmetrical!? If it (the gift card) fits, it sits, it gifts. It also combines the authenticity of a homemade gift with the perceived impersonal element of gifting a card.

Load Up a Mug

You can choose to include some of their favorite sweet or savory treats — we suggest browsing the Co-op Bulk Department — or pad the inside with tissue paper, newspaper, or another material.

A Money-Filled Ornament

Many retailers sell fully or partially clear ornaments that can be taken apart to design. You can certainly spend time designing one… or let our rainbow veggie gift card shine through.

Deck the Halls

Slip your gift card into a deck of cards. Extra creativity points if you use an online site to create a custom deck of cards. Sneaky points if you don’t tell them the gift card is in there and you wait to see how long it takes them to deal a hand.

Slip in a Stylish Wallet

Save your recipient one step and put their gift card where it’s eventually going to end up! This also makes sure the card is protected from being lost in holiday craziness and is “disguised” as a gift card.

Decorative Tin

Don’t throw away that old mint container! Give it a new life with some decorations — bling, fabric, art, and textural pieces are all appropriate. No old mint tin laying around? You can certainly can purchase a new one, but consider taking the mints out and presenting them separately (or keeping them for yourself) to prevent germs from transfering.

Willy Wonka It

Slip it between the inner and outer wrapper of their favorite chocolate bar! Some stealth will be involved in this operation if you want a clean-cut and less noticeable result. Just make sure they don’t automatically throw away the wrapper without notifying!

Wait, Gift Cards Don’t Have Feet!

But your recipient probably does! No one can resist a pair of cozy socks, especially if there’s a great gift card inside!

So what are you waiting for? Purchase a Littleton Co-op gift card today and get to gifting!

Filed Under: Gift Giving Tagged With: craft, DIY, Hanukkah, holiday, holiday gifts, shop local

Actually Easy Back-to-School Recipes

August 16, 2024 By Anastasia Maher

Hi there! Former latchkey kid Anastasia here. I want to talk about after-school snacks and the beef I have with 98% of information out there on the Internet. I think there is a major misunderstanding about what it’s like to be a kid after school or a working-class parent from the bloggers and listicle professionals out there putting together these “Best After-School Snack Recipes.” The first misconception is that you, the adult, have oodles of time to prepare these snacks ahead of time or do all the prep work. I think we all know that’s a “wildest dream/best case scenario.” But, the other misconception these writers have is that school age children also have prep time. In my household, the time between school getting out and after-school activities beginning was nicknamed “Tornado Time.” Most days, I had less than half an hour to get home, catch a break, change, eat a snack, do any necessary household responsibilities, and dash out to my next activity. No offense, I didn’t want to use my precious time marinating tofu and waiting for the oven to preheat to 400 degrees. Also, I’m 12; I don’t think there was room in my brain for what tofu is, if I like it, and oven safety. I had to leave room in my brain for the important things: boys, lip gloss, and getting to dance class on time. And if you want me to “just eat some cut up veggies” and then go to 5 hours of after-school activity and homework, I have some choice words for you. 

So, here are my suggestions for snack recipes that are quick, simple, and require very little, but mostly no assistance from an already overwhelmed adult. 

English muffin pizzas

English Muffin Mini Pizzas 

I think this is a snack great for any age, because it doesn’t require using a knife, and it can be customized for taste preferences and nutritional needs. All you have to do is spoon some marinara or pizza sauce on both sides of a fork-split english muffin, top with cheese, and microwave until the cheese melts. If you have a toaster oven, you can certainly use that for a more authentic pizza taste. Top with favorite pizza toppings like pepperoni or veggies.


Waffle with Nut Butter and ToppingsWaffle with Nut Butter and Toppings

Waffle with butter? Breakfast. Waffle with peanut butter and crunchy toppings? Ultimate snack. If you think about it, this is sort of the deconstructed version of those homemade protein bars or energy bites you’re encouraged to make by every Mommy-blogger. Toasting or microwaving a waffle takes all of 60 seconds. I suggest smothering it in peanut butter (or your favorite nut/seed butter) and adding trail mix-like toppings such as shredded coconut, pumpkin seeds, dried fruit, etc. Protein, carbohydrates, and a bit of sweetness combine for the energy one needs to finish out the day. 


"Sushi" "Dip"“Sushi” “Dip”

Before you even ask; no, I did not mess up my quotation marks, and yes, you could also do this as a roll up. This is definitely a recipe looking for an audience with a more mature taste palette in a younger body. This snack is basically just combining the dealer’s choice of ingredients that go into a basic sushi roll. The base is cucumbers, cream cheese, and carrot sticks. It can also include smoked salmon pieces (or ham for the less adventurous), seaweed strips, avocado, bell pepper sticks, and a seasoning blend like Everything Bagel or Furikake. The reason I share this as a dip and include the quotations around the word is because it’s much simpler to mix than to measure when you’re in a time crunch. In my mind, “dip” is basically just combining ingredients to the level you see fit. But, if one is partial to food aesthetics, all of these ingredients could be put in a thinly sliced cucumber wrap. Dip with crackers, chips, veggies, seaweed crisps, or anything to your heart’s desire. Or, scooped on top of a pre-cooked rice packet. 


Chia PuddingChia Pudding

My adult breakfast of choice would have been a lifesaver as a latchkey kid! Now, this one does require some ahead of time prep (1 tablespoon chia seeds to ¼ cup milk or milk alternative of your choice, mixed and refrigerated overnight or during school). However, I think the payoff is worth it because it will be instantly ready to eat between school and sports or clubs. Add honey, maple syrup, and/or fruit and you have a protein and fiber-packed snack disguised as a sweet treat. In the right container this could totally be hands-free eating for your on the go needs. 


trail mixTrail Mix

Honestly, this suggestion makes me feel a bit like an “Almond Mom,” but it’s hard to ignore the high protein benefits of nuts, fruits, and seeds. There is no shame in buying pre-made, or even pre-portioned options. However, if you have a little prep time, making your own mix is an easy way to get your student interested in what they’re eating. One prep option is to prepare a batch ahead of time, and store in a large container with a serving size scoop. Or, set up a “trail mix bar” with ingredient options in small containers with suggested serving notes (“add one spoonful of me!”) for a new and personalized option every time. Round out the “healthy stuff” with pretzels and chocolate. 


Quesadillas Quesadillas 

Finishing this list like we started it – with the glory of microwaved cheese. Not to be repetitive, but a simple cheese quesadilla is another great and easy option. All one needs to do is grab a flour tortilla, sprinkle shredded or sliced cheese, microwave, and fold. This snack will definitely benefit from being amped-up with the addition of pre-cooked protein options, sliced veggies, or pre-made salsa and guacamole. 


Viola! I hope you and your student found something on this list that looks interesting and can fit their (and your) busy schedules. Even more convenient is the fact that you can get all the ingredients to make all of these options right at the Littleton Food Co-op. Find out what’s on sale and start shopping. Happy snacking! 

Filed Under: The Weekly Radish Newsletter Tagged With: back to school, DIY, farm to school, kid friendly, recipes

How to Make a Dried Citrus Garland

January 18, 2024 By Anastasia Maher

Winter really makes you wonder: how can I keep myself occupied on a snowy day and make my house cozy and warm at the same time? Okay maybe you’ve never pondered that exact thought, but we’re going to answer your question anyway with this Dried Citrus Garland. Dried citrus garlands make great decor all year round, with the added benefit that they are sustainable, pet-friendly, and add a homemade touch of color to any area. If you shopped the annual Co-op citrus sale, this is a great way to use any citrus you didn’t designate for your marmalade-making or smoothie-slurping. Don’t worry, we still have plenty of individual oranges, grapefruits, and more for sale. While you’re here grabbing the supplies for this DIY, don’t forget to pick up some crafting sustenance: perhaps a local craft beer and some Bulk snack mixes. 

@littleton_coop So you got your citrus case this weekend at the Co-op’s annual Citrus Sale…now what? Here Anastasia shows you how to make a dried citrus garland that will be the perfect pop of color for anywhere in your home this weekend. Let us know what you think and if you make one too! #littletoncoop #foodcoop #coop #grocerystore #groceryshopping #citrus #citrusfruit #welovecitrus #littletonnh #casesale #bigsavingsale #citrusgarland #driedfruit #driedcitrusdecor #howtomake #diy #diydecor #diydecorideas #winterdecor #naturaldecor #garland #fyp #foryoupage #forcraftlovers ♬ original sound – Littleton Co-op

Step 1: Come to the Littleton Food Co-op to pick up your citrus! The quantity and variety you choose are totally up to you, as well as whether they are organic or conventional. The quantity you want to pick up will depend on how long you want to make your garland and how full you plan to make your garland look. A garland designed to go over a wide fireplace mantle, or one with no string showing will require more citrus. 

Integrating a variety of citrus into your garland will create visual interest through color, size, and shape. Oranges will produce medium-sized, well-rounded pieces. Grapefruit will be extra large and slightly ovular, with a larger hole in the center. Blood oranges will be small and dark. Lemons and limes can create contrast and bright pops of color. 

We made four well-spaced garlands at three feet each from four navel oranges, one grapefruit, and two blood oranges. One citrus will produce between eight and twelve slices, depending on how thin your slices are and how much of the rind you want to use. 

Step 2: Using your sharpest knife, slice each citrus into rounds, between ⅛ and ¼ inch thick. The thicker the slice, the longer it will take to dry out; however, the thinner you try and make your slice, the more likely it will get damaged or be an incomplete round. This is why a sharp knife is important. If a slice is not even thickness all around, try to trim the thickest side to make for more even cooking. 

Step 3: On a new cutting board, lay out two layers of paper towels. Place a single layer of your citrus rounds on the paper towels. They can be very close together. Put two more layers of paper towels on top of the slices and press down on the paper towels to squeeze juice out of the slices. Do not press so hard that you break the citrus flesh. Repeat this process with fresh paper towels at least once more – the more times you do it and the more juice that comes out will result in a quicker cooking time. 

*If desired, steps 2 and 3 can be done ahead of time. Store sliced citrus in a bag or airtight container in the refrigerator for up to 48 hours. If you are slicing the oranges ahead of time, only do one round of juicing with the paper towels. Then do at least one more round immediately before step 4. 

Step 4: Preheat the oven to 200 degrees. Arrange citrus slices in a single layer on a parchment lined baking sheet. The slices can be very close together, but not overlapping. Put the baking sheet on the top oven rack and set the timer for two hours. Occasionally check on the slices in that time to ensure nothing has shifted during cooking. 

Step 5: Take out the baking sheet after two hours. The citrus will not be totally dried, but they should not still be completely raw, either. Use tongs or a fork to flip each slice over. Some flesh may stick to the parchment paper from the juices, so take care not to rip any flesh when turning.

Step 6: Replace baking sheet in the oven for another two hours. In that time you should monitor the drying of the slices. You want the slices to be completely dry to the touch. Take them out before two hours if you see evidence of burning or charred pieces. If you haven’t take them out at two hours, remove the sheet to check drying process. If the slices are still tacky, stick them back in the oven to complete the drying process. Once done, transfer to a wire cooling rack to finish cooling.

Step 7: When completely cool, carefully use a toothpick, needle, or other sharp object to make a small hole in the flesh near the rind of the slice. Repeat for each slice. The size the hole needs to be will depend on what you’re using to string the slices. For example, a jute twine will need a larger hole from a toothpick, but a clear fishing wire only needs the hole from a needle. Matching the hole size to your string will also prevent the slices from moving around too much.

Step 8: Tie a knot on one side of your string. Thread the slices through the string in whatever order you choose. We recommend laying the citrus out ahead of time to try different arrangements and patterns. You may put as many or as few on a strand as you choose. More citrus on a strand will show less string, but also push the citrus to sit sideways and show more rind. Less on a strand will showcase the entirety of each piece, but will be more susceptible to shifting and less able to conceal mistakes. 

Step 9: Use a strong tape or other hanging material to hang your complete garland. Hanging the garland with a deeper middle (a “bigger swoop”) may also cause the slices to shift and congregate in the middle of the strand. You can rearrange the spacing of the slices once it’s up, and use super glue or poster putty to hold slices in place if needed. 

Step 10: Enjoy a bright pop of color in your home! 


We hope you feel inspired to try this craft in your own home! It does take a lot of time, but the active steps are very minimal. It is also easily customized to fit whatever time, citrus, or design concept you have in mind. Let us know if you follow this DIY and how your garland turns out! 

Filed Under: The Weekly Radish Newsletter Tagged With: craft, DIY


Upcoming Events

Cafe Storytime with Littleton Public Library

Cafe Storytime with Littleton Public Library

May 15, 2025, 10:00 am - 11:00 am
Join the Littleton Public Library in the Co-op Cafe on Thursday, May 15th at 10AM for their weekly storytime with …
Spring Case Lot Sale!

Spring Case Lot Sale!

May 16, 2025, 7:00 am - 9:00 pm
Shop the Littleton Co-op May 16th, 17th, and 18th for extra special deals on cases of your favorite pantry staples! …
Spring Case Lot Sale!

Spring Case Lot Sale!

May 17, 2025, 7:00 am - 9:00 pm
Shop the Littleton Co-op May 16th, 17th, and 18th for extra special deals on cases of your favorite pantry staples! …

View more events here!

Get Our Weekly Newsletter

Every Thursday we release The Weekly Radish, our Co-op newsletter. This contains our latest specials, coupons, member updates, fun articles, recipes, community news, and more. Get it right in your inbox each week! We promise to never share your info, and we will never spam you.

* indicates required
43 Bethlehem Road· On the corner of Cottage St and Rte 302· Exit 41 off I-93· 603-444-2800
Littleton Consumer Cooperative Society, Inc. ®2019 · Designed by Notchnet